Chronicall customers may want to send call data to Salesforce via the WebService Integration API. This API allows customers to send data to a third party end point when a call is presented to an agent, connected with an agent, or when a call is completed. The data that is available to be sent is outlined here.
This article will demonstrate one way to configure the WebService API to send call data to a custom object in Salesforce when a call is presented to an agent in a group.
There are four general steps in completing this configuration.
1) Create a custom object in Salesforce.
2) Create a Salesforce flow to add the data to the custom object.
3) Create a visual force page to receive data from Chronicall and launch the flow.
4) Configuring the Chronicall WebService Integration API to send the data.
1) Create a Custom SalesForce Object Named "Chronicall Call Data"
Create a custom object called "Chronicall Call Data". Add the following custom fields to the object:
| Custom Field | Field Type |
| Agent | Text Field |
| Caller Name | Text Field |
| Call Direction | Text Field |
| DNIS | Text Field |
| Call Skill | Text Field |
| Call Time | Text Field |
| External Number | Text Field |
2) Create a Flow to Add the External Link to the Correct Record
Open the flow designer and create the following variables:
| Variable Name | Variable Type | Input / Output Type |
| agent | Variable - Text | Input And Output |
| callerName | Variable - Text | Input And Output |
| callDirection | Variable - Text | Input And Output |
| dnis | Variable - Text | Input And Output |
| callSkill | Variable - Text | Input And Output |
| callTime | Variable - Text | Input And Output |
| externalNumber | Variable - Text | Input And Output |
| CalculatedTime* | Variable - Formula |
*The CalculateTime formula should be "(((VALUE({!callTime})/1000)-21600) / 86400) + DATETIMEVALUE( "1970-01-01 00:00:00" )"
Add a Create Records element. Set it to create a record on the "Chronicall Call Data" object and configure it as shown:

Note that an Owner ID is required. In this case it is hard coded to an Admin User.
Save the flow as "Chronicall WebService Integration API" and make sure that it is an autolaunched flow. This flow will take the data received from Chronicall and create a record on the new "Chronicall Call Data" object.
3) Create a Visual Force Page to Receive Data From Chronicall
Here is a visual force page and controller used to launch the flow we created and sets the parameters of the flow. The URL of this page will be required in the configuration of the Chronicall API. If the agents being recorded are logged in Salesforce users they will need access to this page through user permissions. If the agent is not a logged in Salesforce user you may need to place this on a public facing force.com site and enable all the necessary permissions.
<apex:page controller="ChronicallWebServiceIntegrationAPI" action="{!init}" showHeader="false" standardStylesheets="false">

    <flow:interview name="Chronicall_WebService_Integration_API">
         <apex:param name="agent" value="{!agent}"/>
         <apex:param name="callerName" value="{!callerName}"/>
         <apex:param name="callDirection" value="{!callDirection}"/>
         <apex:param name="dnis" value="{!dnis}"/>
         <apex:param name="callSkill" value="{!callSkill}"/>
         <apex:param name="callTime" value="{!callTime}"/>
         <apex:param name="externalNumber" value="{!externalNumber}"/>
     </flow:interview>
</apex:page>


public class ChronicallRecordingAPI {

    public string agent {get; set;}
    public string callerName{get; set;}
    public string callDirection{get; set;}
    public string dnis{get; set;}
    public string callSkill{get; set;}
    public string callTime{get; set;}
    public string externalNumber{get; set;}

    public PageReference init() {
    if ( ApexPages.currentPage().getParameters().get('agent') != null )
         agent = ApexPages.currentPage().getParameters().get('agent');

    if ( ApexPages.currentPage().getParameters().get('callerName') != null )
         callerName = ApexPages.currentPage().getParameters().get('callerName');

    if ( ApexPages.currentPage().getParameters().get('callDirection') != null )
         callDirection = ApexPages.currentPage().getParameters().get('callDirection');

    if ( ApexPages.currentPage().getParameters().get('dnis') != null )
         dnis = ApexPages.currentPage().getParameters().get('dnis');

    if ( ApexPages.currentPage().getParameters().get('callSkill') != null )
         callSkill = ApexPages.currentPage().getParameters().get('callSkill');

    if ( ApexPages.currentPage().getParameters().get('callTime') != null )
         callTime = ApexPages.currentPage().getParameters().get('callTime');

    if ( ApexPages.currentPage().getParameters().get('externalNumber') != null )
         externalNumber = ApexPages.currentPage().getParameters().get('externalNumber');

        return null;
    }
}
Make the Page Accessible
Now that your visual force page is created, it needs to be placed on a force.com site. You will also need to give your guest user permission to read and write to your newly created "Chronicall Call Data" object as well as the newly created visual force page.
4) Configuring the Chronicall WebService Integration API
Navigate to API Enablement > WebService Integration
Configure the fields:
Profile Name: Push to Salesforce
Target URL: The URL of the page created above. i.e. http://businessName.force.com/ChronicallWebServiceInegrationAPI
Triggering Call Criteria: Select the agents, groups, and or skills you want the API to execute for.
HTTP Method: GET
URL Parameters: See below
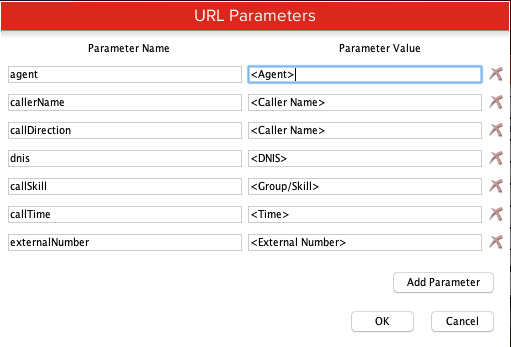
Triggering Event: Call is Presenting
Enter the URL of the visual force page and select the users for whom the API should trigger for.